
SIRI POWER UP MODE N8N WORKFLOW BLUEPRINT
SIRI POWER UP MODE N8N WORKFLOW BLUEPRINT
( Developed and curated by Shane Perry )
Download The N8N Blueprint to Upgrade Siri and Use Voice Commands For Your Workflows 🚀
Download Workflow Blueprint & Import Into N8N.io
Step 1: Download the N8N Workflow Blueprint
- Access the Download Link
- Go to the page with the N8N workflow blueprint (in your case, the “Siri Power Up Mode N8N Workflow Blueprint” page).
- Locate the download link for the N8N workflow blueprint.
- Download the File
- Click the download button to save the .json or any other compatible file to your local machine.
Step 2: Log into Your N8N Account
- Go to the N8N Website
- Open your browser and visit N8N.io.
- Log In to Your Account
- Use your credentials to sign in. If you don’t have an account, you may need to create one.
Step 3: Import the Workflow into N8N
- Go to the Workflows Section
- After logging in, navigate to the Workflows section from the dashboard.
- Import the Workflow
- Click the Import button, usually located on the top right.
- Select the downloaded .json workflow file from Step 1.
First Step
Copy The ( Two ) Power Up Siri Shortcuts To Your Apple Device
Step-by-Step: What Each Block Does in N8N
Download Shortcut Here: https://www.icloud.com/shortcuts/e8f3a6cd3bf54a02abd3139399a7ccac
Download Shortcut 2 Here: https://www.icloud.com/shortcuts/4a1eb7ac6bf745d08858826c9322ff87
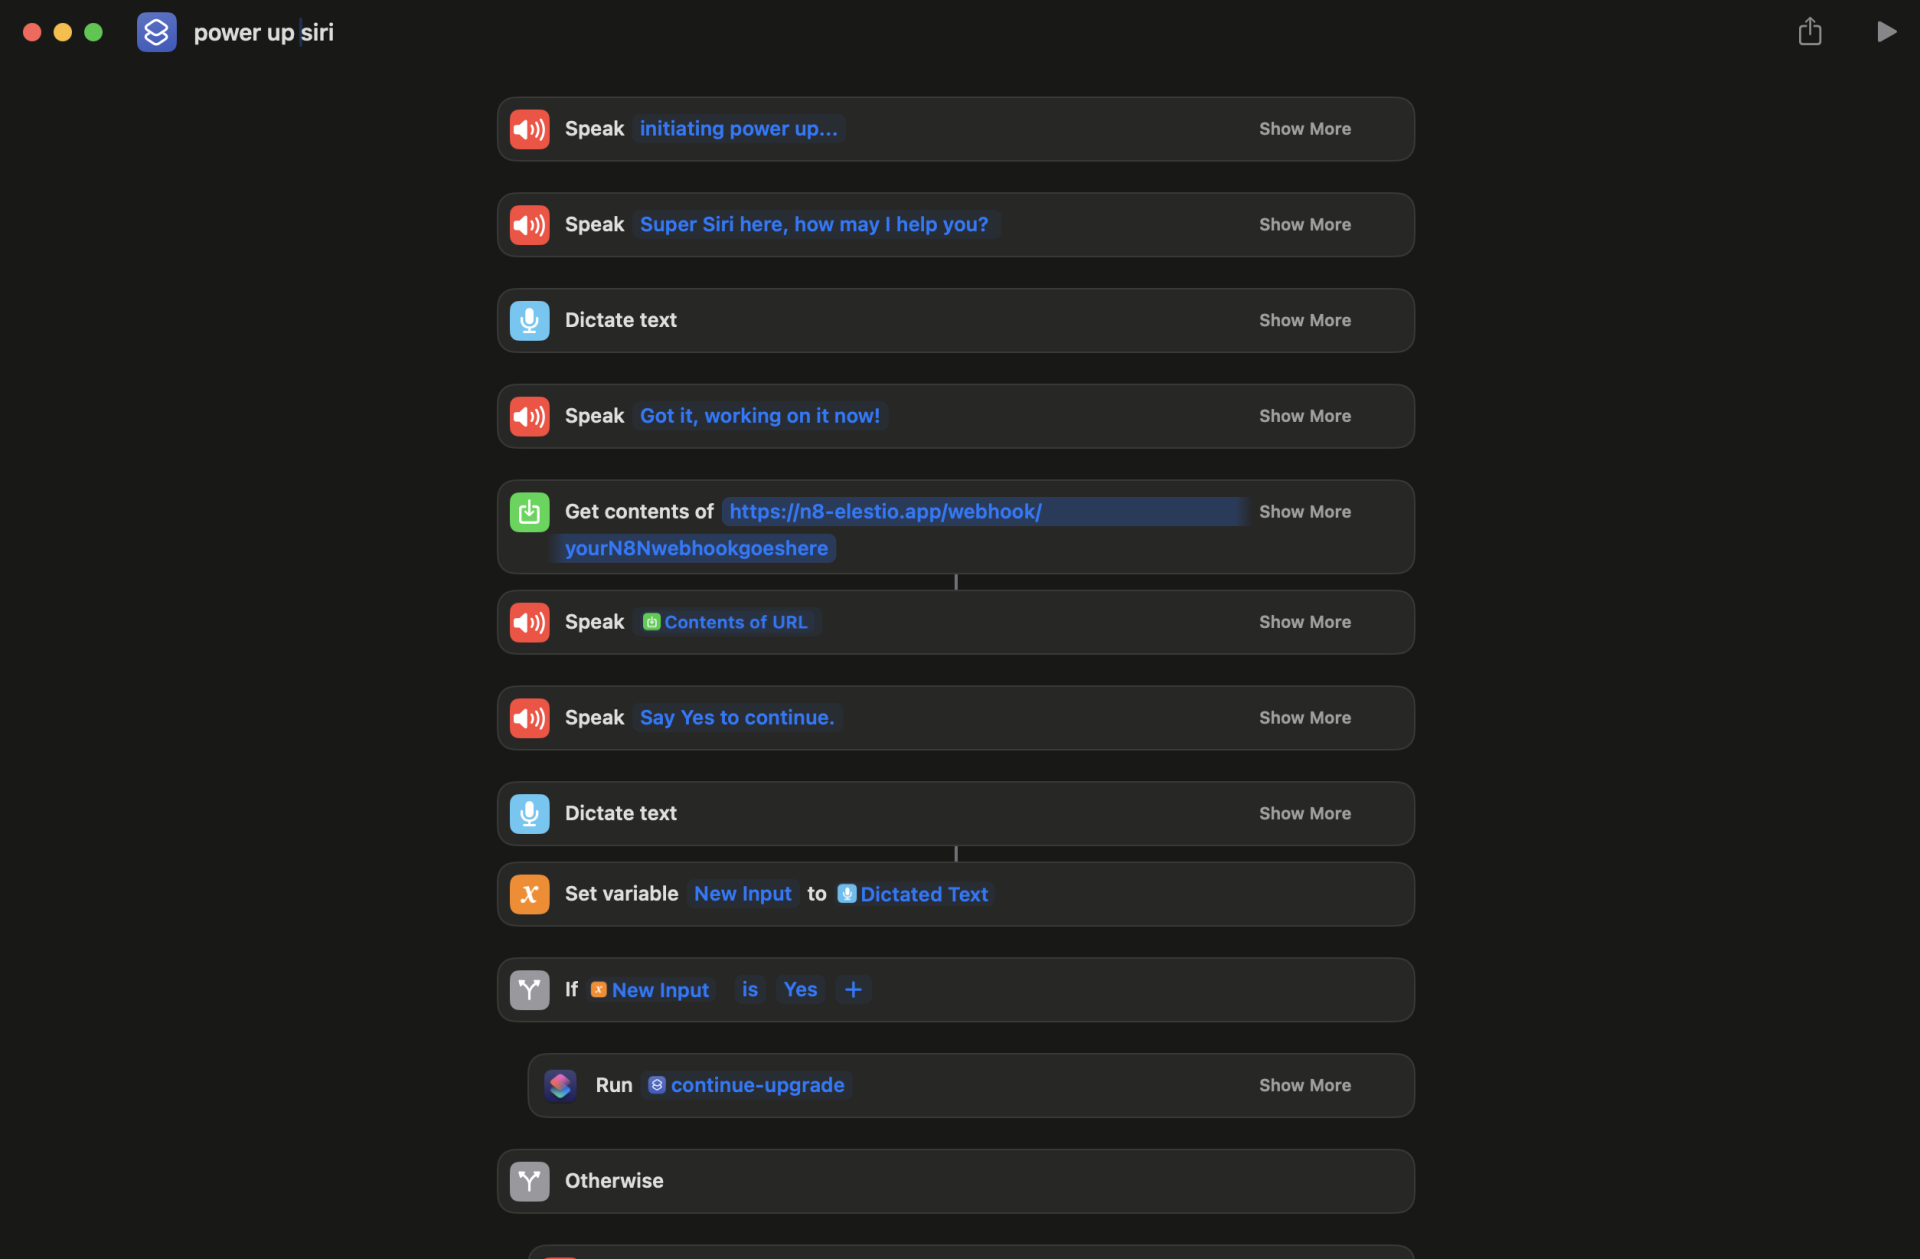
1. Dictate Text
Function: Prompts Siri to listen for user input. This is the follow-up input or command the user gives after the first interaction.
What to Update: Nothing required. However, you could customize the spoken prompt before this block (in Shortcuts) to ask something specific like “What’s your next instruction?”
2. Set Variable – First Input
Function: Stores the user’s dictated text into a variable named First Input so it can be reused later (e.g., in a webhook or logic condition).
What to Update: Ensure the variable name here (First Input) is consistent if reused later in webhook payloads or conditions.
3. Speak – “Got it, working on it now!”
Function: Provides voice feedback to the user, confirming the request has been received.
What to Update: Optional. You can customize the tone/language, e.g., “On it, boss!” or “Processing your command.”
4. Get Contents of URL
Function: Sends the user’s input to an N8N webhook.
URL shown: https://n8n.cloud/webhook/yourN8Nwebhookgoeshere
What to Update:
You must replace this URL with your actual N8N webhook endpoint (from the Webhook node in your N8N workflow).
Make sure that:
The method is set to POST (in N8N and Siri Shortcuts).
You’re sending the data properly (i.e., either as a query param or in JSON if required).
Tip: Match this with the webhook node ID or path in N8N. If your Webhook node expects a field like inputText, your request must include that name.
5. Speak – Contents of URL
Function: Speaks the response received from the webhook.
What to Update: Ensure the webhook is actually returning a spoken-friendly string like “The weather in LA is sunny” or “Task has been created.”
6. Speak – “Say Yes to continue.”
Function: Asks the user to say “Yes” if they want to proceed to the next phase.
What to Update: Optional — customize for branding/personality. Examples:
“Would you like me to keep going?”
“Continue this mission?”
7. Dictate Text
Function: Listens for a new voice response (e.g., “Yes” or “No”).
8. Set Variable – Second Input
Function: Saves the new dictated input into a second variable called Second Input.
9. If Second Input is Yes
Function: Conditional logic that checks if the user said “Yes”.
What to Update:
Make sure your condition block in Siri Shortcuts is case-insensitive or supports slight variations like “yes”, “Yes”, “yeah”, etc.
10. Run Shortcut – continue-upgrade 1
Function: If the user says yes, this runs the next Siri Shortcut.
What to Update:
Update the Shortcut name if you’ve renamed your continuation workflow. Also, make sure it’s installed on the device and shares any necessary variables.
11. Otherwise → Speak
Function: If the user says anything besides “Yes,” the shortcut ends gracefully.
Speak – “Thank you, have a great day ahead!”
Speak – “Super Siri, powering down”
What to Update: Customize farewell messages to match tone or user experience goals.
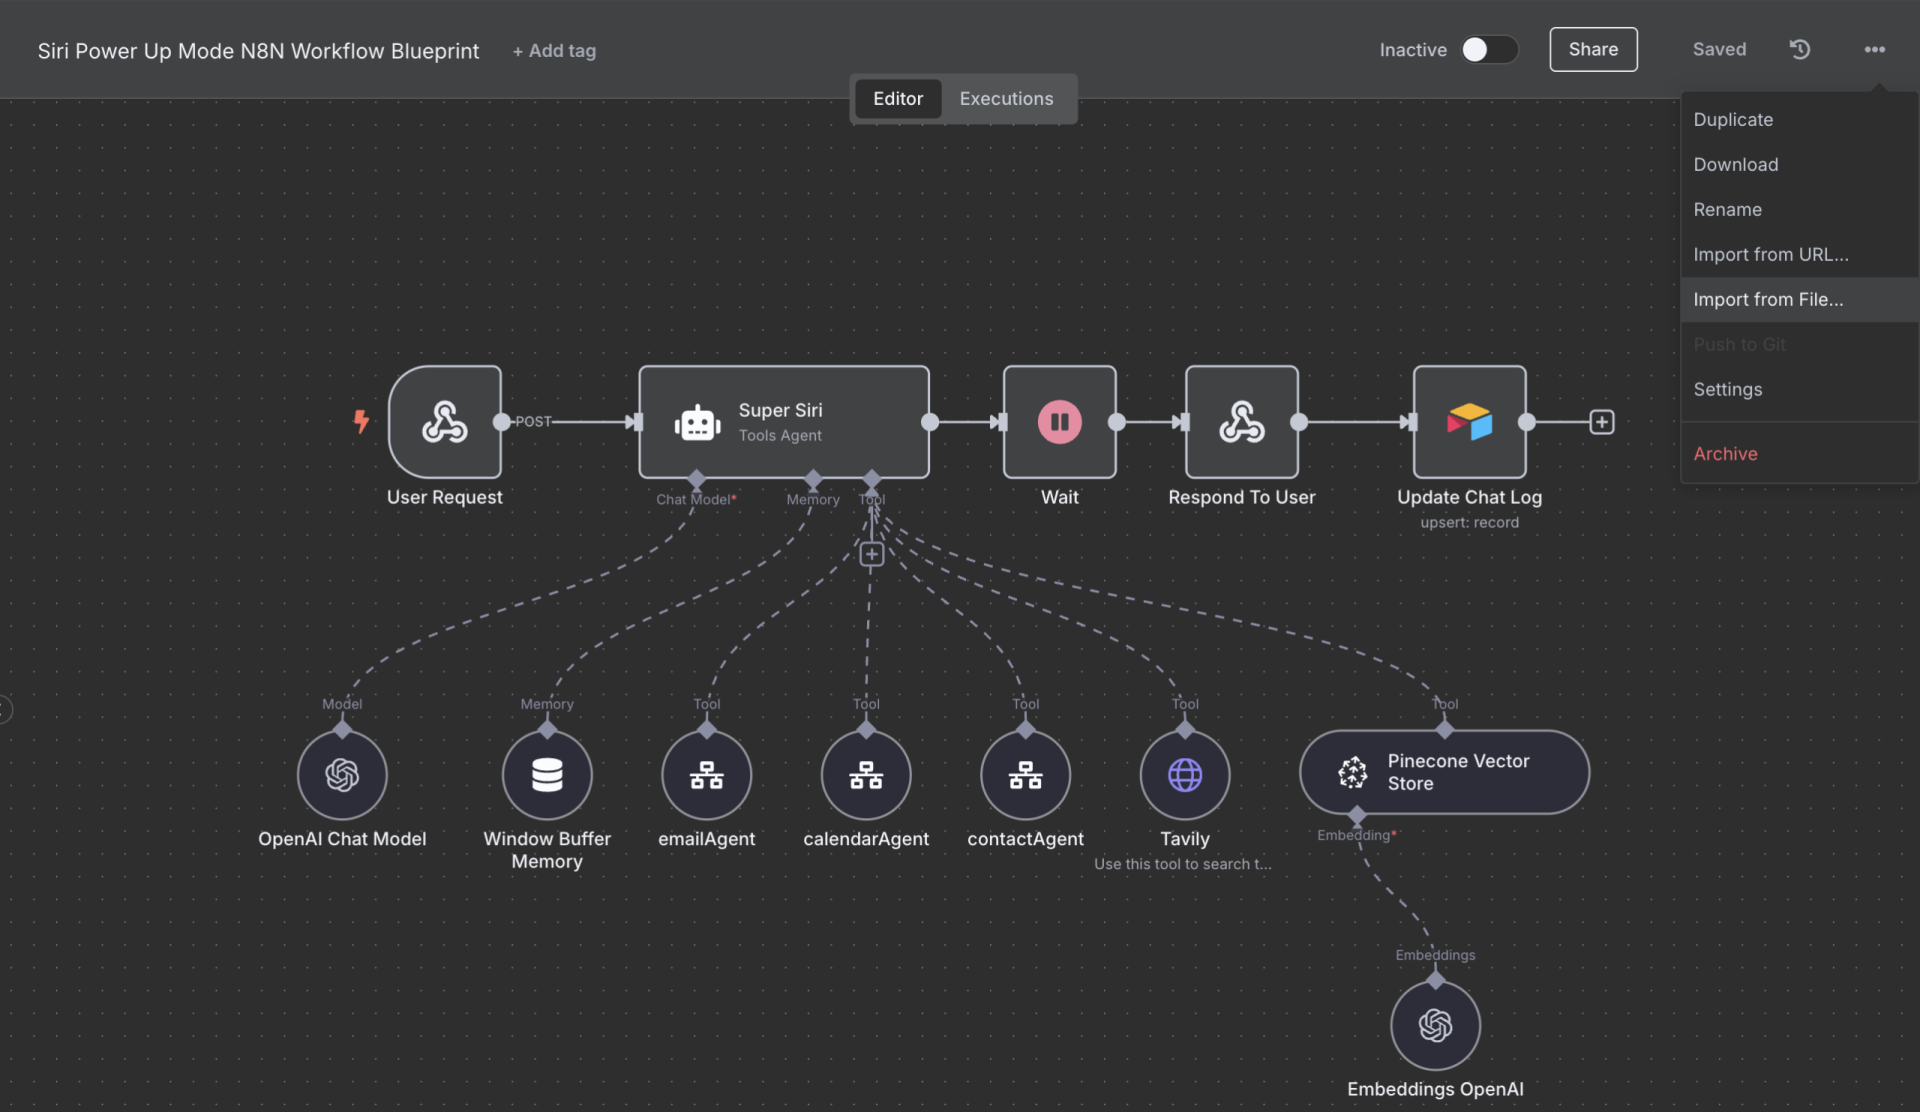
Developer Notes: N8N Setup Recap
Webhook Node in N8N:
Must accept POST requests.
Should parse First Input and return a spoken result in plain text.
Test with sample input first via Postman or N8N UI to verify expected return.
Second Step
Update Each Node Credentials and Customize Your Tools
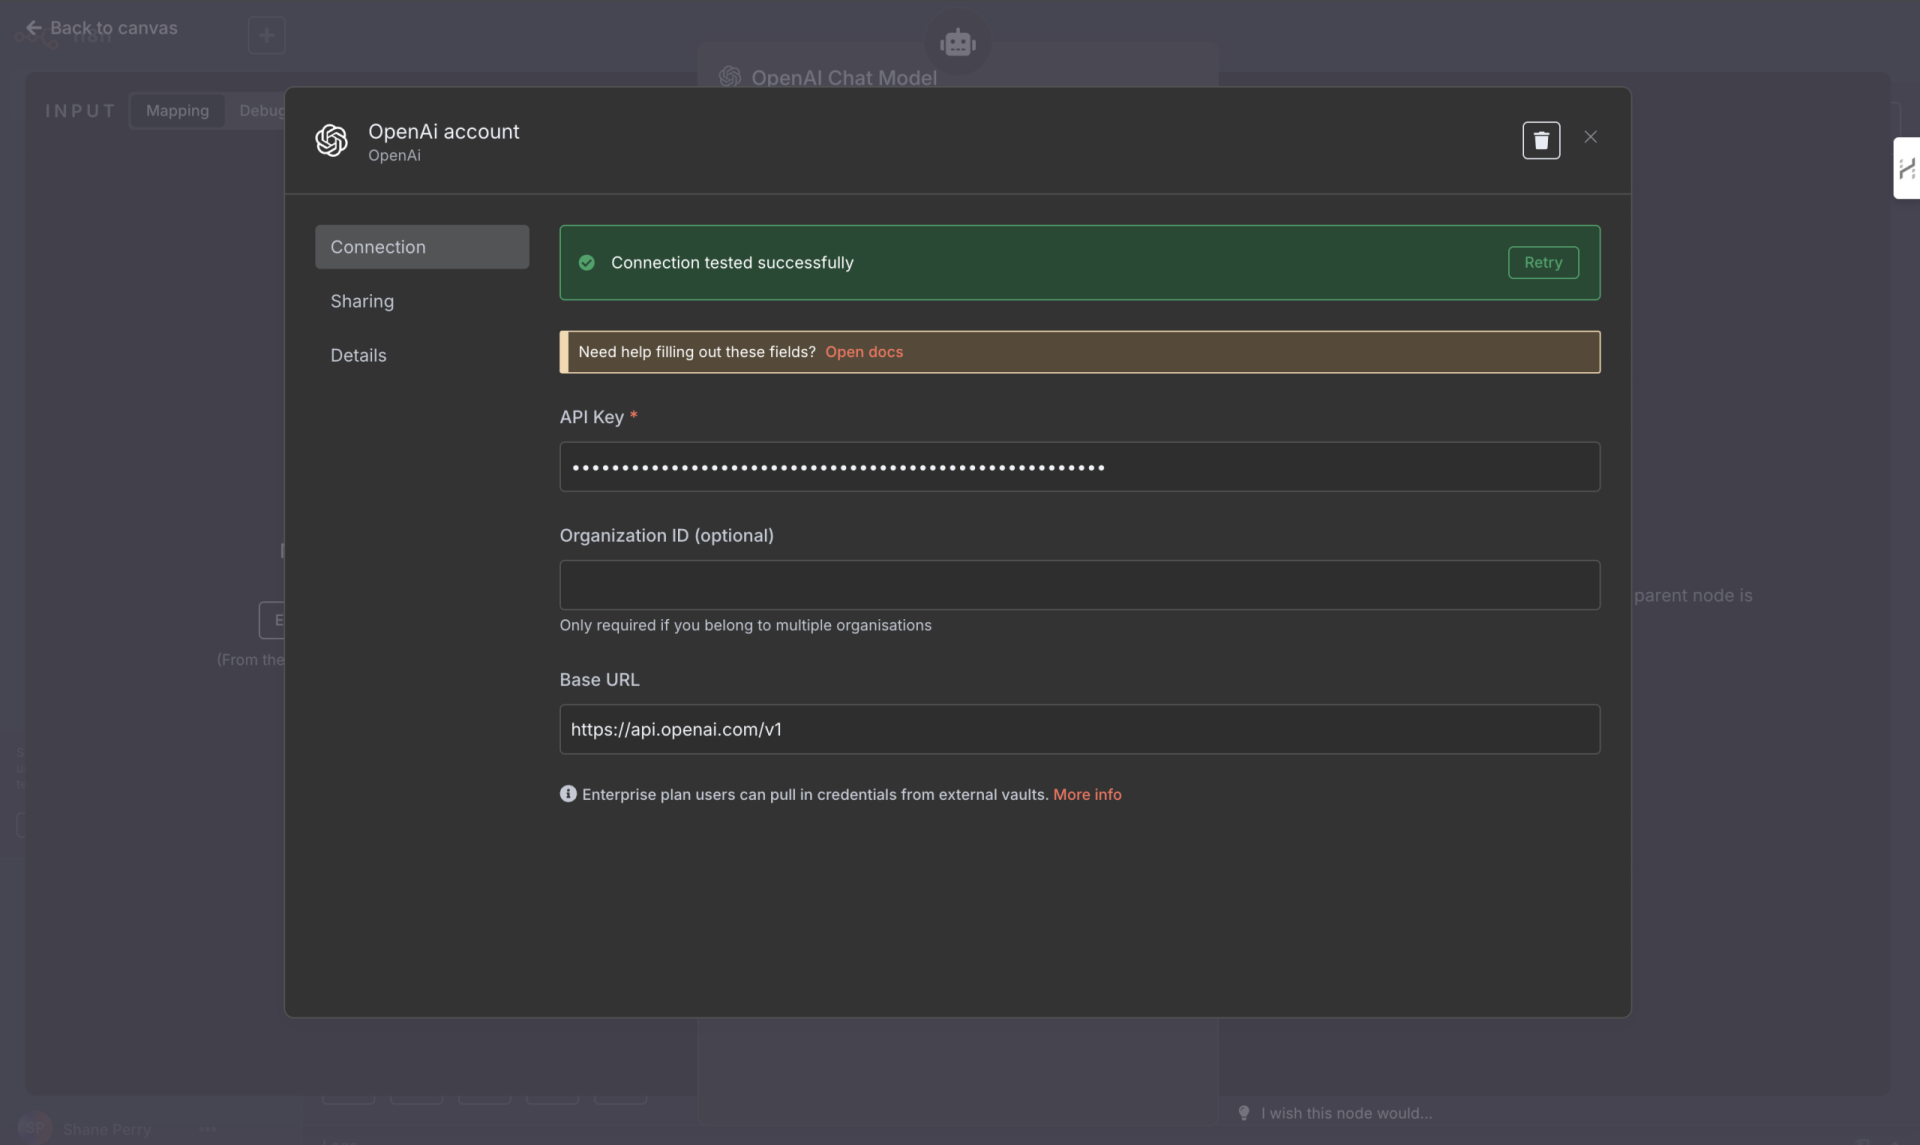
1. Replace Placeholder Credentials in Each Node
- Open each node in your N8N workflow (e.g., Webhook, Pinecone Database, AI Agent, etc.).
- Update any authentication fields, API keys, or email addresses with your real credentials.
- For example:
- In OpenAI or external APIs: insert your valid API key.
- In any HTTP Request node: confirm the endpoint, headers, and payload are correct.
Tip: Hover over the node’s warning icon to identify missing or invalid credentials.
2. Test Each Node in the Flow
- Use the “Test workflow” individually or click on button at the bottom of the editor.
- Trigger the workflow via your configured your Apple device.
- As each node runs, check for green checkmarks (success) or red errors (failures).
- If any node fails:
- Reopen the node.
- Review the input/output data.
- Fix any credential, formatting, or logic errors, then retest.
3. Add a different Tools
Customize this workflow by adding tools that the AI Agent can access. This will help your shortcut in your device be able to handle a lot more automations than just talking back and forth.